
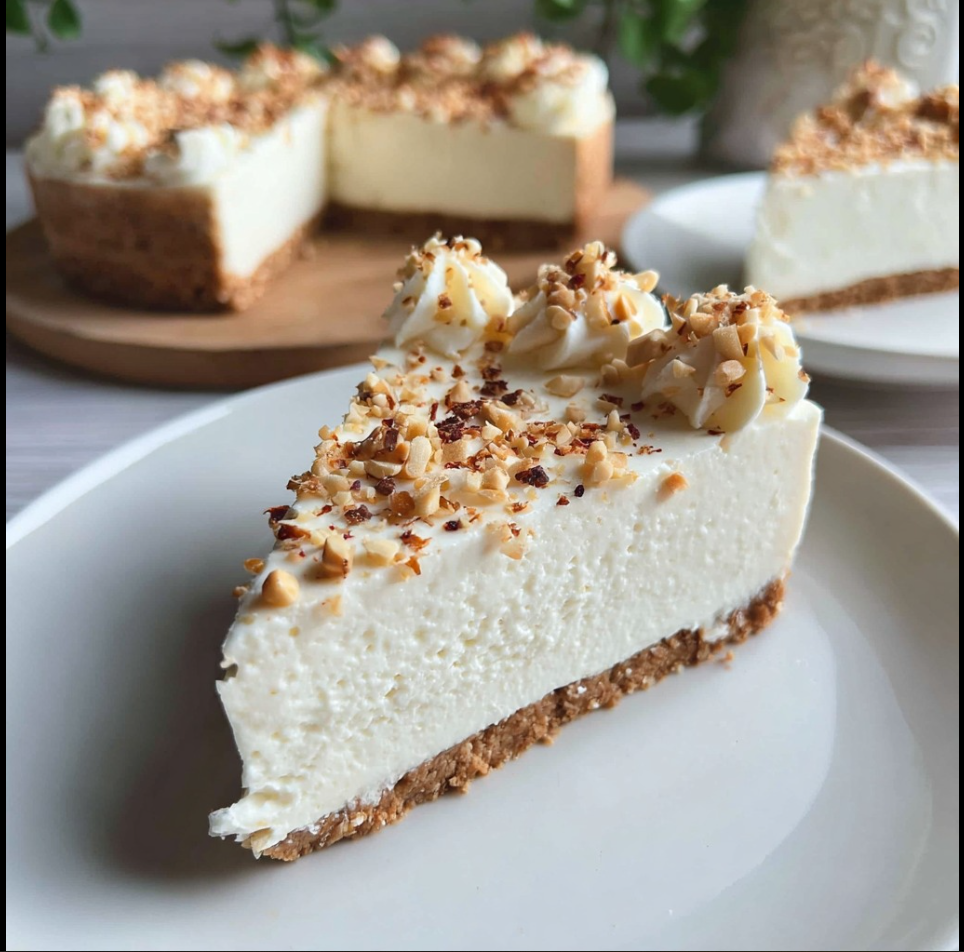
- Decorate: Sprinkle the chopped hazelnuts generously over the top of the cheesecake. You can lightly press them in so they adhere to the surface without sinking. Optionally, reserve a small portion of the whipped cream to pipe decorative rosettes or swirls around the edges before adding the hazelnuts. This adds a refined touch and a contrast in texture and appearance. The roasted hazelnuts bring a pleasant crunch and a nutty flavor that balances the rich creaminess of the filling.
- Chill: Cover the cheesecake and refrigerate for at least 4 hours, ideally overnight. This resting time is crucial to allow the filling to firm up and achieve the ideal smooth yet sliceable consistency. During this time, the flavors also meld together, and the crust becomes more cohesive with the filling. Only once fully chilled should the cheesecake be unmolded and served.
Tips & Variations
Ease of unmolding: Before unmolding, wrap the outside of the springform pan with a warm cloth for a few seconds. This softens the edges and makes for a clean, crack-free release from the mold.
Ingredient swap: The chopped hazelnuts can be replaced with almonds or pecans, depending on your taste preferences. Each brings a unique flavor and crunch to the dessert.
Optional crust baking: For a firmer, crispier crust, you may pre-bake the biscuit base at 180°C for 10 minutes. Let it cool completely before adding the filling. This adds a slightly toasted note and extra structure to the dessert.
La suite de l’article se trouve à la page suivante
Publicité

Yo Make również polubił
Un père milliardaire voit une serveuse noire laisser son fils handicapé guider un pas de danse — et sa vie bascule…
Masque Visage au Café et à la Vaseline : Un Remède Naturel pour une Peau Hydratée et Éclatante
Mes parents ont exigé que je laisse ma sœur monter sur scène et recevoir à ma place le titre de major de promo. Quand j’ai refusé, mon père a explosé : « Nous avons payé pour tes études, enfant ingrate ! » J’ai souri, je me suis écartée et j’ai simplement dit : « Alors regardez bien. » Ce qui s’est passé ensuite sur cette scène leur a donné une leçon qu’ils n’oublieront jamais.
— « Sans que maman ait sa part, pas de mariage ! » déclara le fiancé. La mariée prit cette phrase comme la marche à suivre… et s’enfuit.